Spray
Paint / Respray Your Car
In 8 Simple Steps With Photos ...
Share This:
You
don't have to be a professional to achieve a showroom finish. Thanks to
the high quality of most car paints and lacquers on the market, you can save yourself
a fortune when touching up slight damage or re-spraying repaired car bodywork. Warm
and dry conditions are ideal for spray painting, as aerosols don't always work
best in the damp and colder temperatures hinder drying time. If it's not warm
and dry outside, work in a well-ventilated garage. Wear overalls or old clothes
and disposable gloves - goggles and a dust mask will also keep stray droplets
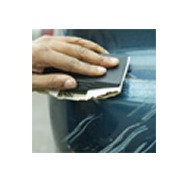
of spray paint away from your eyes, nose and mouth. To
prepare for spraying, use aluminium oxide abrasive paper (graded at 80 grit) to
rub the surface to be painted down to bare metal. Apply a rust treatment product
if required, following the manufacturer's instructions and allowing it to dry
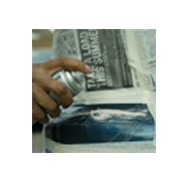
fully. The
area to be painted should now be clean and dry - any traces of dirt or wax can
be removed using cellulose thinners. Mask off any areas not being painted using
masking tape and newspaper (to avoid hard edges, increase the area to be painted
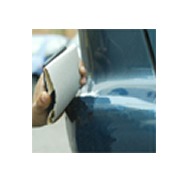
by moving the masking tape back gradually as you apply each coat of paint). Holding
the spray can approximately 25cm away from the surface to be painted, apply a
number of coats of primer at 15-minute intervals until the area is evenly covered.
Go an inch over the original layer of paint to help it blend in, using several
light layers of paint. Allow
at least 24 hours for the primer to dry thoroughly, then rub down with 1500 grit
wet and dry paper until smooth. Clean the area with warm, soapy water, rinse,
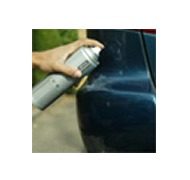
then dry fully. To
start painting, shake the can vigorously for two minutes to ensure the paint is
thoroughly mixed. Apply a number of coats at 15-minute intervals, shaking the
can between each one. If
you're using a metallic paint colour, allow the paintwork 24 hours to dry then
rub it down with 1200 grit wet and dry paper. It should lose its gloss appearance
and take on a dull, matt finish. Clean with warm, soapy water, rinse and dry. Now
apply two coats of lacquer, separated by a gap of 15-minutes. Halfords stock a
petrol-resistant lacquer for fuel tanks/motorbikes etc. If
the finish looks patchy, apply another coat of paint or wait until the surface
is completely dry before rubbing it down and starting the lacquering process again. Hope
you found this article useful. If
you want like a step-by-step video course, check out SprayPaintSecrets
below: Find
Out More About SprayPaintSecrets
» Give
Your Automobile A Complete Makeover! Check
out these spray paint jobs below. A new paint job will breath new
life into your aging automobile. The difference can be really astounding.
And all
it takes is less than a days work with Spray Paint Secrets 2 DVD Course... From
Garage Makeovers... Wait!
Before You Go... SprayPaintSecrets.com |