How
to Custom Paint a Car Video :
Color Sand a Car for Painting
Share This:
The purpose of this video is to break down some pointers and/or flaws with this video training and see if you can identify with them: Flaw #1: This is very important - contrary to what the instructor told you in the video above, only use sand paper of 2000 grit or more. Anything more coarse is a chain saw to your paint job. Flaw #2: He's sanding the bits of dirt out of the paintwork,i don't know why there should be dirt in there if car was painted in spraybooth. Here is another guide on color sanding which I hope will be useful for you: Color Sanding Guide With Pictures :
After countless hours of meticulous body-panel preparation, the next step in refinishing your musclecar is to apply a new paint job. After the paint dries, the appearance usually looks good, but not great. Why? The vehicle might need to be color-sanded to deliver the proper, final, flat, super-shiny look. But most car crafters shriek at the thought of sanding a new paint job. Color sanding is simple, however, if you have the proper sanding know-how. Color sanding is done for several reasons, and if done correctly, it can yield outstanding final results. The color-sanding process smooths out the minute waviness in the paint (known as orange peel) and removes minor imperfections in the paint and the clearcoat (such as tiny particles of dust stuck in the clearcoat).
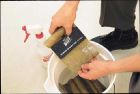
Always use clean water, and lots of it, when color- sanding paint. Wrap the color-sanding paper around a pliable sanding backing pad to help evenly distribute sanding pressure.
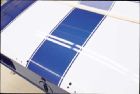
This photo shows the before and after look of wet sanding. The left side of the hood shows the standard orange-peel look in a new paint job. The right side of the hood shows the smooth look after being color-sanded and buffed.
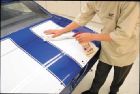
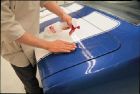
Before color sanding, carefully wipe the painted area with a chemical cleaner and a towel to remove dust, dirt, and oily buildups. Often car crafters begin sanding the panel without cleaning it first, which grinds the dirt into the new paint.
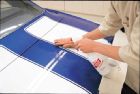
Choose the proper wet-sanding paper based on the overall condition of the paint. If orange peel is heavy, use 1,000- or 1,200-grit paper. Use 1,500-grit paper for average orange peel. Always use water when color sanding. Apply light pressure and sand in one direction, not in circles. As you sand, you can feel the sandpaper glide over the smooth areas; the paper will provide resistance over the non-sanded areas.
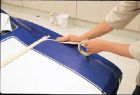
Continually add water as you sand, and work carefully. At various times, rinse the sanded area to remove sanding debris, and then squeegee off the body panel to inspect your work.
Close inspection reveals that this surface is unevenly sanded. A properly sanded surface produces a dull, smooth look. The shiny spots in the paint (arrow) need to be sanded further to match the surrounding smoothed-out surface.
If orange peel is heavy (thus requiring the initial use of aggressive 1,000- or 1,200-grit paper), resand the painted area with a less aggressive paper such as 2,000 grit. As always, use plenty of water, and sand in one direction--not in circles.
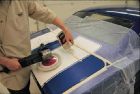
After the painted surfaces have been color-sanded, you&8217ll need to polish the paint with a buffing compound and a buffing wheel. To prevent burning through the edges of the paint around body-panel junctions, cover the areas with masking tape.
Choose a buffing pad based on your car’s color-sanded finish. Our surface still had some minor sanding scratches, so a more aggressive wool buffing pad was used. Apply some buffing compound and begin working the area carefully. Keep the buffer speed low and work the buffer back and forth while applying light pressure. Keep the buffer flat as you go, and don’t apply heavy downward pressure or buff with the edge of the wool puffing pad. Add more buffing compound as you move to new areas. Many rubbing compounds don’t break down as you use them, which continually cuts into the paint. Instead use a buffing compound (such as Meguiar&8217s Compound Power Cleaner) that continually breaks down--becoming less aggressive--as you buff.
After buffing the panel with a wool buffing pad and Meguiar’s Compound, we switched to a much softer Soft Buff foam buffing pad. The foam pad is far less aggressive than the wool pad, and teamed up with some Meguiar’s Swirl Free Polish, it generated a highly polished final look. Afterward, you should not wax the paint for 60 days. Wax won’t let the new paint’s solvents escape, thus resulting in a hazy finish. I
hoped you've enjoyed this lesson.
Get
Your Hands On A More Comprehensive & Professional Car Spray Painting Course... Announcing: Spray Paint Secrets™ The
Definitive Step-By-Step Course That Leads You By The Hand and
Click Here To Visit The Official Site »You're
About To Learn Secrets The Most People |


To
Remarkable Spray Painting,
Mario
Goldstein
"The Auto Artist"
P.S:
This is the lowest price for the best level of information
on car spray painting. If you want to learn how the professionals do
it, Grab
your copy now at the introductory price »
SprayPaintSecrets.com |
|